Very close to Tringulum galaxy M33 we may spot a bright open cluster towards Perseus constellation. Its name is M34 and here it is a picture I took today through a remote 6 inch apochromatic refractor on New Mexico that shows colorful stars. Enjoy it!
Archive for Telescope
M34 Open Cluster at Perseus Constellation
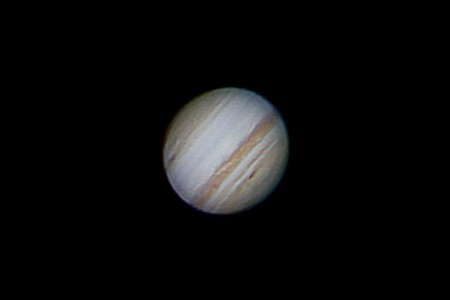
Posted in Astrophotography with tags 6 inches, apochromatic, Astronomy, Astrophotography, color, Fitswork4, M34, Open Cluster, Paint Shop Pro 9, refractor, starts, Telescope on 2013/10/12 by computerphysicslabJupiter through a 10 inch Mewlon telescope
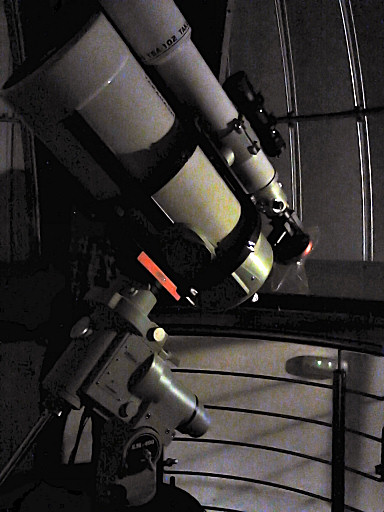
Posted in Astrophotography with tags 10 inches, Jupiter, Mewlon, observation, takahashi, Telescope, visual on 2013/02/09 by computerphysicslabThe telescope is a reflector Takahashi Dall-Kirkham at f/12, yielding 3 meters of focal.
I have also realized that when sit down in a chair and keeping the vision of the planet during several minutes trying different focus, the eye eventually adapts to the brightness of the planet and increasingly captures more details.
Here it is a picture of the setup:
Buy now a telescope to see the stars
Posted in Astrophotography with tags Astronomy, Buy, Stars, Store, Telescope on 2012/08/20 by computerphysicslabCheck out our new telescope store. Cheap prices and fast deliveries.
Moon scratched by the claw of a bear
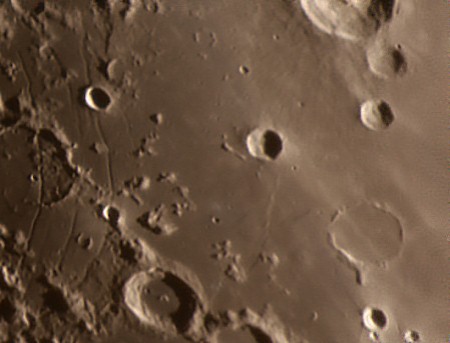
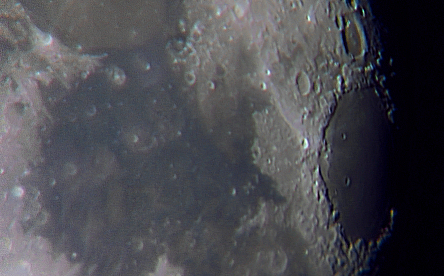
Posted in Astrophotography with tags Astronomy, Astrophotography, Bullialdus crater, Canon EOS 450D, Manual-Crazy-Tracking, Meade Lightbridge 16", Moon, Newtonian, no tracking, Reflex, Registax, Rimae Hippalus, Telescope on 2011/08/31 by computerphysicslabNear Bullialdus crater (at top-right side of the picture) there is a quite interesting region called Rimae Hippalus. Hippalus crater is the big one (left-center side of the picture). It is a big crater. In this image, shadows in this crater due to a low altitude sunlight creates a visual effect, as if a great creature had stamped his bare footprint in lunar soil. Do you see it?
Bright nebulae at Milky Way core
Posted in Astrophotography with tags Astronomy, Astrophotography, Canon EOS 450D, constellation, Deep sky, Fitswork4, Milky Way, nebula, Rebel XSi, Reflex, Sagittarius, Scorpius, Telescope on 2011/07/04 by computerphysicslabSummer views of Milky Way are spectacular because the galaxy bulge is brighter and broader than its spiral arms visible the rest of the year. Located near Sagittarius and Scorpius constellations, the bright nebulae and dark lanes of the area creates a beautiful contrast in brightness and colors.
This picture is a 4-pane mosaic ensambled with free software Fitswork 4.40. Every pane is a 10 minutes exposition through a 55mm lens attached to a Canon EOS 450d (Rebel XSi) DSLR camera, mounted over a motorized equatorial mount, Sky Watcher EQ6.
A full resolution picture is available at AweSky
Mare Crisium and Palus Somni
Posted in Astrophotography with tags Astronomy, Astrophotography, Canon EOS 450D, craterlets, craters, Impact crater, Mare Crisium, Moon, Palus Somni, Proclus, Rebel XSi, solar system, Telescope on 2011/02/28 by computerphysicslabMare Crisium is one of my favorite Moon areas. There is a lot of details inside Crisium, but it is not easy to detect, because it is very fine. High aperture telescopes are needed to spot the small impact craters inside this maria, because its typical lengths are 1 or 2 kilometers wide.
Near Mare Crisium there is another big area called Palus Somni (below), that is visible in this picture made with an amateur telescope. The big and bright crater in the middle is Proclus:
The telescope used is a Celestron Nexstar 5SE and the camera is a Canon EOS 450d (Rebel XSi) DSLR. The picture actually is a mosaic made of two panes.
Celestron NexStar 5SE vs Takahashi FS102
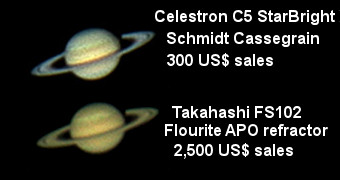
Posted in Astrophotography with tags Amateur, Apochromat, Astronomy, c5, Catadioptric, Celestron NexStar 5SE, Fitswork4, fluorite, planet, refractor, Registax, Saturn, Schmidt-Cassegrain, Takahashi FS102, Telescope on 2011/02/19 by computerphysicslabThis week I had the chance to test a Takahashi FS102 refractor apochromatic fluorite telescope and also a Celestron NexStar 5SE Schmidt-Cassegrain catadioptric telescope. First one has an aperture of 102mm and second one of 125mm plus a central obstruction. Their light gathering power is similar and also their theoretical resolution. Nevertheless I wanted to check by myself the mythical optical quality of FS102 in contrast to the well-known Celestron.
Tests were made using the same camera to capture video and similar weather conditions both nights. I took in both cases a video of the planet Saturn when reaching the meridian, its maximum altitude. Celestron C5 perform flawlessly because I could get a sharp view of Saturn and its ring at 500x magnification. Takahashi also let me reach that high powers with a crisp result. C5’s focuser is very precise, but Takahashi’s is even more being a rack and pinion system. Focusing the FS 102 was very pleasant due to its smoothness and accuracy. Probably a better contrast in visual images delivered by refractor telescopes also gave it an advantage here.
Trying to resolve fine details, in both telescopes I could see the shadow of Saturn over the rings clearly. Here it is the final picture after applying Registax and Fitswork4 to both videos.
Sharing raw footage of Jupiter and Saturn
Posted in Astrophotography with tags apochromatic, Astronomy, Canon EOS 450D, fs102, Jupiter, Rebel XSi, refractor, Registax, Saturno, stacking, takahashi, Telescope on 2011/02/11 by computerphysicslabOn 2011-02-06 I took some videos of Jupiter and Saturn through a (4 inch) 102mm apochromatic refractor telescope. Applying Registax I got the results of the picture.
I’d like to share these two videos with anybody interested in playing with them:
http://www.mediafire.com/file/tqkri1z5z4pw8ge/Saturn-Takahashi-FS-102-F40-2011-02-06-divx.avi
http://www.mediafire.com/file/jbu38q5ucq9diwz/Jupiter-Takahashi-FS-102-F40-2011-02-06-divx.avi
Fringe color filter – Achromatic refractor
Posted in Astrophotography with tags Astronomy, Astrophotography, filter, Jupiter, Refracting telescope, Telescope on 2010/12/12 by computerphysicslab
- Image via Wikipedia
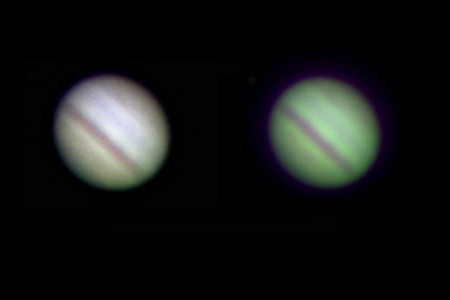
Fringe color filters are able to cut almost completely the secondary spectrum on images taken through telescopes that yield chromatic aberrations, like an achromatic refractor. Here is an example of the difference between an picture of Jupiter taken through a fringe color filter (left) and a similar picture taken without that filter (right).
Related articles
- Tips on Learning to Use Telescopes (brighthub.com)
- Good Telescopes for Kids (brighthub.com)
Pluto, a dwarf planet
Posted in Astrophotography with tags 6-inch, Astronomy, dwarf, planet, pluto, refractor, solar system, Telescope on 2010/10/22 by computerphysicslabThis picture is the result of stacking 9 subframes of 120 seconds of exposition each one through a 6-inch refractor telescope.
Pluto is a dwarf planet in the solar system, part of a double planetary system with its satellite Charon. It has a highly eccentric orbit inclined to the ecliptic, which runs until closer at perihelion inside the orbit of Neptune. The Pluto-Charon system has two moons: Nix and Hydra. These are celestial bodies that share the same category.
It was discovered on February 18, 1930 by American astronomer Clyde William Tombaugh (1906-1997) from the Lowell Observatory in Flagstaff, Arizona, and as the ninth and smallest planet in the Solar System by the International Astronomical Union and public opinion from then until 2006, but their group of planets in the solar system was always the subject of controversy among astronomers.
Its great distance from the Sun and the Earth, coupled with its small size, prevents shine below the magnitude 13.8 in its best moments (orbital perihelion and opposition), so it can be spotted only with telescopes bigger than 200 mm aperture (although there are people that says it can be spotted through apertures of 125 mm), photographically or CCD camera. It appears as star-looking, yellow, featureless point of light (apparent diameter of less than 0.1 arcsec).
Apochromatic vs Achromatic Refractor
Posted in Astrophotography with tags aberration, achromatic, apochromatic, Astronomy, Astrophotography, chromatic, compare, equipment, myth, Sky Watcher, takahashi, Telescope, versus on 2010/10/14 by computerphysicslabPeople should think twice before purchasing an apochromatic refractor as opposed to an achromatic telescope. There is a huge difference in price and a small difference in performance according to an experiment I made recently.
In doing astrophotography, people use to spend a lot of money in equipment. It is important not to fall into the elitist apochromatic myth if you want to save some money.
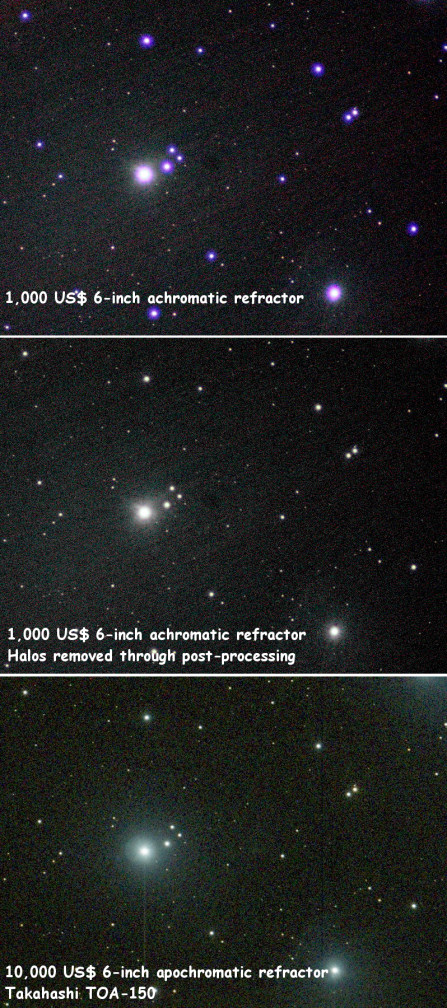
I took a single 30 seconds shot to Pleiades open cluster (M45) using my 6-inch Sky-Watcher achromatic refractor that costs around 1,000 US$. Then I used a 6-inch apochromatic Takahashi TOA-150 that costs around 10,000 US$ to take an equivalent shot on the same field.
Resulting images speak by themselves. Obviously achromatic refractor shows a blue halo around stars, due to chromatic aberration. Nevertheless, a simple post-processing technique can remove the halo, obtaining a similar image to apochromatic’s.
Now, the question is: Is it worth paying the extra 9,000 US$?
Comet 103P/Hartley
Posted in Astrophotography with tags 103P, Astronomy, Astrophotography, Comet, Hartley, Hertley2, Telescope on 2010/10/12 by computerphysicslabComet Hartley 2, officially known as 103P/Hartley 2 is a small comet that orbits the Sun with a period of 6.46 years. It was discovered by astronomer Malcolm Hartley in 1986 using the Schmidt telescope in Siding Spring Observatory (Australia).
It is estimated that its nucleus has a size between 1200 and 1600 meters, according to recent observations of the Spitzer Space Telescope (August 2008): its albedo, very small, is close to 0.028 as it is covered with very dark carbonaceous bodies probably hydrocarbons. The mass is estimated around 3 × 10 ^ 11 kg.
In its approach to the Sun of 2010 is visible in the constellations of Cassiopeia, Perseus and Auriga, but could be visible to the naked eye in mid-October of that year from places with dark skies: it reaches its minimum distance from our planet on October 20th standing at only 0.12 Astronomical Units. A few days later, on October 28th, passes through the perihelion located a little over 157 million miles from our star.
In their approach the year 2010 this image was obtained through a 6-inch refractor telescope.
Its next step takes place on April 2017.
Jupiter 2010 Opposition
Posted in Astrophotography with tags 2010, Astronomy, Astrophotography, Jupiter, Opposition, Telescope on 2010/10/03 by computerphysicslabCurrently, Jupiter is at its minimum distance from Earth, which does not happen since 47 years. While the largest planet in the solar system can always be spotted with the naked eye, this time will look brighter.
The phenomenon is called opposition, and occurs when a planet is located exactly opposite to the Sun in the sky, meaning, the same side of Earth’s orbit about the sun. In such cases, the distance between the two planets is minimal. The oppositions between Earth and Jupiter occur every 13 months.
However, as the orbits of both planets are not perfectly round nor perfectly concentric, these approaches are not always the same. There is a “better” and a “worse” opposition. And the gap between the two planets varies from 591 to 676 millions of kilometers. Consequently, the brightness and apparent size of Jupiter also varies.
The current opposition of Jupiter is excellent, with the planet at nearly 592 million of kilometers from Earth. Equivalent to about 1,500 times the distance to the Moon, but Earth and Jupiter can not get much closer than that. The last time Jupiter was so close to Earth in October 1963 was 47 years ago. And it will not happen again until September 2022.
M57, the Ring Nebula
Posted in Astrophotography with tags afocal, Astronomy, Canon EOS 450D, Deep sky, M57, Messier 57, NGC 6720, Planetary Nebula M57, Rebel XSi, Reflex, Ring Nebula, Telescope on 2010/09/21 by computerphysicslabThe Ring Nebula (also known as the Planetary Nebula M57, Messier 57, M57 or NGC 6720) is a prototypical planetary nebula in the constellation of Lyra. This is one of the most famous nebulae often used as an example of this type of astronomical objects. It is located at 0.7 kpc (2300 light years) from Earth and was discovered by Antoine Darquier de Pellepoix in 1779.
Their joint magnitude V-band (green filter) is equal to 8.80. Its real form is possibly a bipolar nebula seen with an inclination of 30 ° from its axis, and calculated that it has been expanding around 1600 years.
From their radial velocity, -19.2 km/s, it follows that approaches Earth more than 69120 km/h: this rate is caused by the combination of the sun’s orbital speed around the nucleus of the Milky Way and the speed of the Earth itself.
M57 is illuminated by a white dwarf at its center of visual magnitude 15.8.
This picture is a single shot of 30 seconds exposition through a SkyWatcher 6 inches refractor telescope at prime focus. Fitsworks4 was used to remove a bit the background noise.
Saturn with a 6 inches refractor
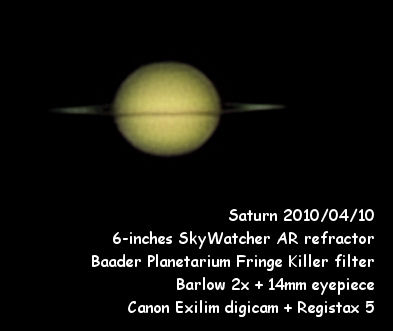
Posted in Astrophotography with tags 150 mm, 6 inches refractor, achromatic, Astronomy, Casio Exilim EX-FS10, Fringe Killer, psp9, Registax, Saturn, Sky Watcher, Telescope on 2010/04/10 by computerphysicslabA 300mm telephoto vs a 6 inches refractor
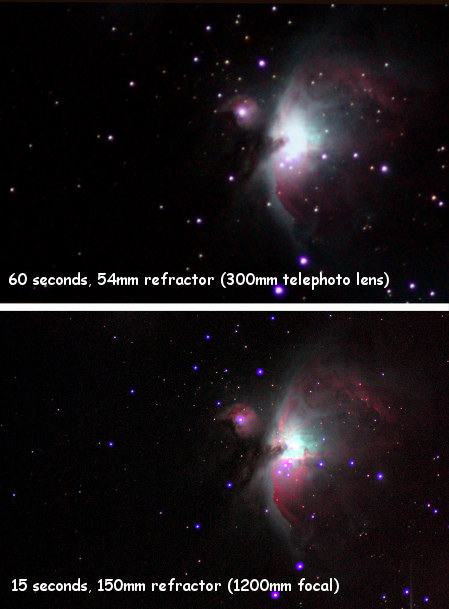
Posted in Astrophotography with tags 6 inches refractor, Astronomy, Canon EOS 450D, EQ6 equatorial mount, M42, Rebel XTi, Reflex, Tamron SP-54B 300mm, Telescope on 2010/02/22 by computerphysicslabThe Tamron SP 54 is a 300mm telephoto lens, with an aperture of 54mm. I took a 60 seconds of exposition image of M42 in Orion. A few months later I took a 15 seconds image of the same field through a 6 inches Sky-Watcher non-apo refractor.
The comparison throws some interesting conclusions:
1.- A 150mm lens gives more resolution than a 54mm lens. Stars are fainter in the 6 inches refractor picture.
2.- The light captured by a 54mm lens in 60 seconds is nearly equivalent to the one captured by a 150mm lens in 15 seconds. Nebulosity appears practically equal in brightness in the two pictures. The lower image is a full frame, meanwhile the upper one is cropped at 25%.
Both images were taken using an unmodded Canon DSLR camera, EOS 450D (or Rebel XTi) and an EQ6 equatorial mount.
Nova in Eridanus
Posted in Astrophotography with tags 2009, Bradford, C14, Canary Islands, Eridanus, Nova, robotic, Teide, Telescope on 2009/12/20 by computerphysicslabIn spite of the cloudy skies I could get a shot of a Nova that has appeared in Eridanus constellation. The key to get this shot is having used a remote robotic telescope through Internet, Bradford telescope located at Teide mountain in Canary Islands.
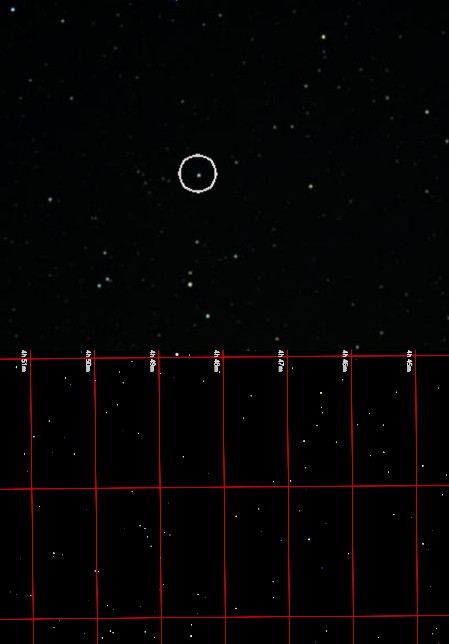
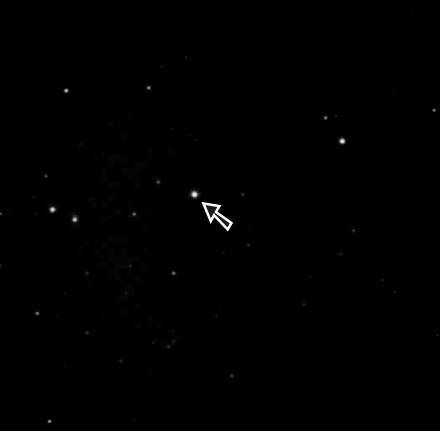
The image is the result of 2 minutes of exposition through the Cluster camera of Bradford Robotic telescope. The Nova is located at 6 degrees from Rigel (Orion). There is attached a map of the area, in which it is visible that the Nova is not registered in the chart.
And here it is the same area as viewed with more magnification through the Celestron C14 main telescope at Bradford Observatory. The image was taken on 2009-12-25, so several days after the previous image, but Eridanus Nova remains clearly visible.
A very fast Lightbridge 16 review
Posted in Astrophotography with tags Collimation, Meade Lightbridge 16", Newtonian, Telescope on 2009/11/06 by computerphysicslabHello, Id like to ask a question about your experience with the 16″ Lightbridge. I’ve read some good reviews and bad reviews about it. I’ve read that it is very hard to collimate and that the focuser may not come perfectly perpendicular to the tube assembly from the factory and may need shimming to properly align it.
I’d like to know your opinion on these things and also the quality of the focuser. Is there much flex in the trusses? Have you been able to attain crisp clear focus? Would you recommend this scope, or to rather spend an extra $1000 to get a similar sized Discovery scope?
Thanks!
-Joey
————————————————–
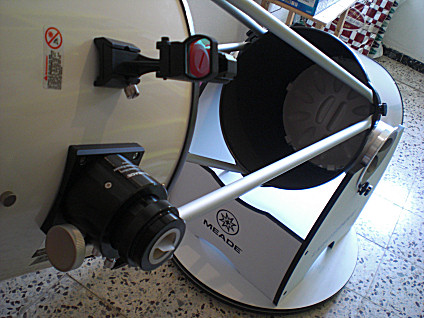
Collimation is an important issue when observing through Meade Lightbridge 16″. Mainly for planets and Moon, because a good collimation gives much better images at high magnification. When moving the telescope, it is usual to get discollimation, so every time you move it, you firstly have to collimate it before observing.
Another disadvantage of this telescope is its weight. It weights a lot and it is not easy to move from one place to another.
Nevertheless starfield views are incredible due to its high aperture, mainly under dark skies. It becomes very easy to observe deep sky objects. It is impressive to observe Dumbell nebula at 200x.
To attain crisp clear focus is very difficult when observing planets or the Moon due to atmospheric turbulence. 16 inches of aperture are very sensitive to turbulence.
I would recommend the telescope if you are planing to be observing always at the same place. It is a very cheap telescope taking into account its aperture.
I cannot talk about Discovery telescope, because I have never watched through one of them.
Regards,
Mare Tranquillitatis in color
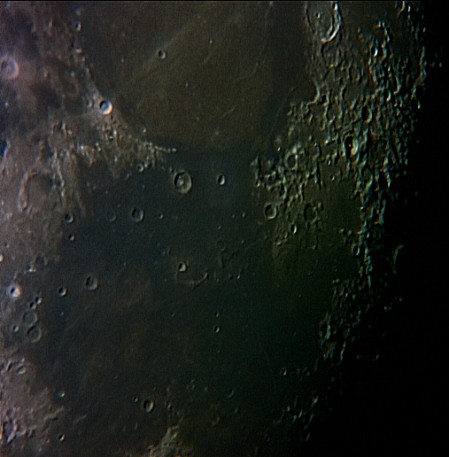
Posted in Astrophotography with tags 150/750, afocal, Astronomy, Canon EOS 450D, Manual-Crazy-Tracking, Mare Serenitatis, Mare Tranquillitatis, Moon, Newtonian, Paint Shop Pro, Rebel XTi, Reflector, Registax, Telescope, terminator on 2009/09/11 by computerphysicslabColor contrasts in the Moon are interesting even beautiful. The following picture shows Mare Tranquillitatis area and the southern part of Mare Serenitatis in full color. It was taken 4 days after full moon. The shadows in the terminator show the orography of the landscape. Mare Tranquillitatis seems to be mainly blue. This is due to its peculiar chemical composition.
Pitiscus
Posted in Astrophotography with tags 150/750, afocal, Astronomy, Canon EOS 450D, crater, Hommel, Ideler, Manual-Crazy-Tracking, Moon, Newtonian, Noiseware, Paint Shop Pro, Pitiscus, Rebel XTi, Reflector, Reflex, Registax, Spallanzani, Telescope, terminator on 2009/09/09 by computerphysicslabPitiscus, Hommel, Ideler and Spallanzani are the only four craters of the picture with proper name. The rest of them are named by letter surnames like Ideler R or Ideler L. They are located in the South-East area of the Moon. The picture was taken on 2009-09-09 05h 20m U.T. and the terminator was passing across Pitiscus, Hommel, the two big and shadowed craters. Pitiscus is 85 km wide and Hommel is 129 km (76 miles). The smallest craters of the image are 7 km wide, that is 3.5 arcseconds, 1.75 arcseconds for the bright spot and 1.75 arcseconds for the shadow spot. Image detail could then be better for a 6-inch telescope (this is the equipment used to take the image, an scope capable up to 0.7 arcseconds of resolution). 622 subframes were recorded with the Manual-Crazy-Tracking system and stacked in Registax 5.

Posidonius
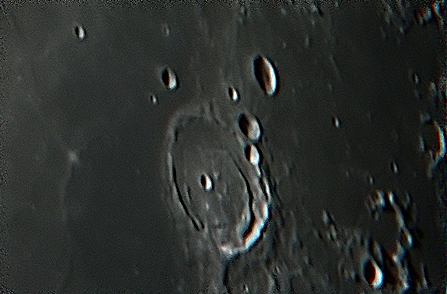
Posted in Astrophotography with tags 150/750, afocal, Astronomy, Canon EOS 450D, Chacornac, crater, Manual-Crazy-Tracking, Mare Serenitatis, Moon, Newtonian, Noiseware, Posidonius, Rebel XTi, Telescope on 2009/09/08 by computerphysicslabPosidonius is a big crater of the Moon on Mare Serenitatis. There is a lot of interesting details to observe inside: peaks, ridges, craterlets, … In the following image taken yesterday night, 4 km wide craters can be spot as small white points in the smooth surface of Mare Serenitatis.
Posidonius measures 95 km in diameter. The second biggest crater (a bit ghostly) in the picture is Chacornac, just below Posidonius. Inside it is visible a small craterlet called Chacornac A (it measures 5 km in diameter).
The third biggest crater of the picture is Daniell (31 km wide) located in the upper middle side. Its shape is not circular, but oval. This is the cause of a strange effect in perspective when comparing it with the craters nearby.
PosidoniusPosidonius is a lunar impact crater that is located on the western edge of Mare Serenitatis
Dorsum Oppel
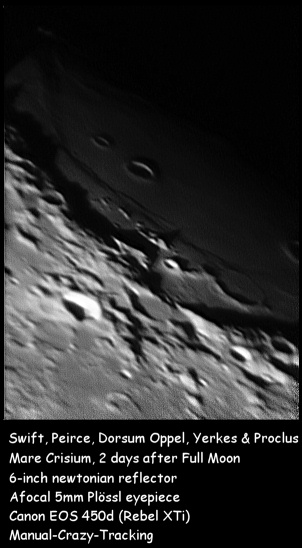
Posted in Astrophotography with tags 150/750, afocal, Astronomy, Canon EOS 450D, Dorsum Oppel, Manual-Crazy-Tracking, Mare Crisium, Moon, Newtonian, Peirce, Proclus, Swift, Telescope, terminator, wrinkle ridge, Yerkes on 2009/09/07 by computerphysicslabDorsum Oppel is a wrinkle ridge of the Moon in Mare Crisium. 2 days after full moon is the best moment to observe it. It is a very large formation and the landscape along is quite impressive, full of small craters, tiny mountains and the smooth floor of Mare Crisium. It is important to reach a high magnification to enjoy the view (150x at least).
My setup is a 6-inch telescope, but I bet it is possible to observe it comfortably with a 4-inch refractor.
The bright and overexposed crater is Proclus. I have to work harder the dynamic range issue next time.
Swift and Peirce are the pair of craters in the upper side of the picture, near the lunar terminator. Below Peirce should be visible a 2 kms wide craterlet, but unfortunately my picture cannot yield such a resolution. According to a quick calculation, 3 kms is the smallest visible feature in theis image, and that corresponds to 1.5 arcseconds. A bit far still to the maximum theoretical resolution of a 6-inch telescope (that is around 0.7 arcseconds)
Yerkes is the big ghostly crater in the right side. Apparently there is a central peak in its center. I have been looking for a confirmation of the existence of that peak, but I haven’t found any reliable source where it is mentioned. Any hint here, I would be thankful…
Manual Crazy Tracking
Posted in Astrophotography with tags 150/750, afocal, Astronomy, GRS, Jupiter, Manual-Crazy-Tracking, Newtonian, shift-and-add, Telescope, webcam on 2009/09/01 by computerphysicslabLacking of an equatorial mount I have built myself a kind of manual tracking system that keeps into the field of view of a webcam a planet like Jupiter, for 3 minutes. This is long enough to record useful data and then post-process it with aggressive wavelets.
The resulting tracking is not at all perfect. You may see Jupiter swinging around the screen. It is important to capture the data at a fast shutter speed (1/100 sec.) to avoid motion blur in every frame because the planet is always dancing.
In spite of this movement, the results after stacking are very good. Here I show this really simple system and the resulting yesterday’s Jupiter with the webcam:
![]()
![]()
![]()
As you can see the Manual-Crazy-Tracking is a very simple system that consists in a rubber band attached to the tripod handle. If you try to track manually directly pushing the tripod handle, the shaking is excessive and you would need a very very fast shutter speed to get some useful data. The rubber band is necessary to reduce vibrations and increase the shift movement control.
At beginning Jupiter is located in the center of the field of view with no need to any corrections. As long as it drifts due to its sidereal movement you will have to pull using the rubber band in order to keep it in the center of the screen (it is supposed you have a laptop there capturing and showing images from the webcam). This way you may have Jupiter centered in the screen for a long time. You will have time to focus (left hand pulling the rubber band and right hand tweaking the focuser) and time to expose.
Jupiter, Io & Wesley impact scar
Posted in Astrophotography with tags 150/750, afocal, Astronomy, Canon EOS 450D, impact, Jupiter, Newtonian, no tracking, Paint Shop Pro, Registax, scar, shift-and-add, Telescope, Wesley on 2009/08/28 by computerphysicslabGood seeing yesterday too (2009-08-27 23h05m UT). Wesley impact scar is fading day after day, but it is still there. I made an animation that shows Io approaching Jupiter’s limb: http://www.youtube.com/watch?v=78zJtv569y4

Big Jupo
Posted in Astrophotography with tags 150/750, afocal, Astronomy, Canon EOS 450D, EOS Camera Movie Record, Jupiter, Mitchell, Newtonian, no tracking, Paint Shop Pro, Photoshop, Rebel XTi, Reflector, Reflex, resampling, shift-and-add, Telescope, VirtualDub on 2009/08/27 by computerphysicslabI have a good seeing last night. So I got my best Jupiter yet. Here it is:
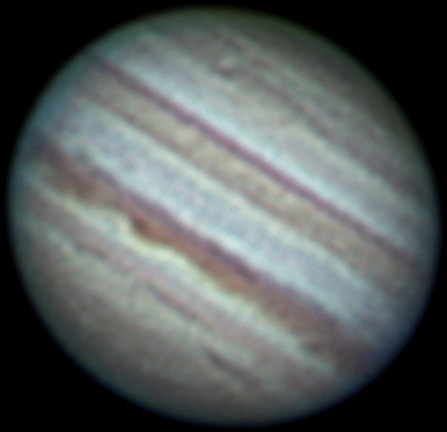
It is 4x resampled via Registax Mitchell and PS. After resampled I can spot more details in bands and polar zones.
As always I used the 6-inch no-EQ mounted newtonian reflector, the 14mm eyepiece doing afocal projection over the Canon EOS 450d (Rebel XTi) body and recording video using “EOS Camera Movie Record” free software. Three times Jupiter crossed over the field of view. Registax and VirtualDub added and stacked the footage properly.
Jupiter Opposition
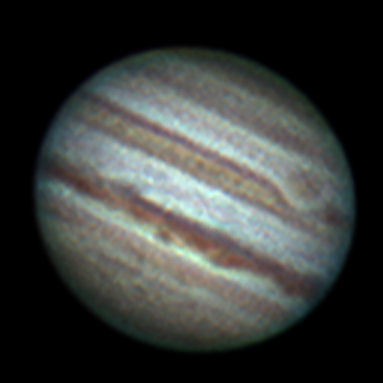
Posted in Astrophotography with tags 150/750, afocal, Canon EOS 450D, Jupiter, Newtonian, no tracking, Opposition, Paint Shop Pro, Photoshop, Rebel XTi, Reflector, Reflex, shift-and-add, Telescope on 2009/08/17 by computerphysicslab15th August 2009 was the day that Jupiter reached its closest position to Earth. Its apparent diameter was 49 arcseconds, so this is the best time to do planetary astrophotography with the giant planet. Using the afocal technique and a Canon EOS 450d body I took 2 video sequences and processed with Registax 5, Photoshop & Pain Shop Pro.
Jupiter selection & post-processing
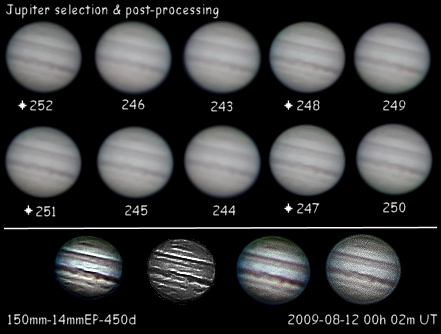
Posted in Astrophotography with tags afocal, Astronomy, Canon EOS 450D, Jupiter, Newtonian, no tracking, post-processing, shift-and-add, Telescope on 2009/08/12 by computerphysicslabYesterday I took several videos with Canon EOS 450d (Rebel XTi) to Jupiter through the no-EQ mounted 150mm reflector. The final effective resolution of every video is slightly different, depending on the weather conditions and the focus reached in this precise instant. So I have chosen the two best sequential videos and appended each other into one final with double frame size.
After selecting and appending, I used Photoshop to apply a hard sharpen, and several other filters getting different final results. Here they are.
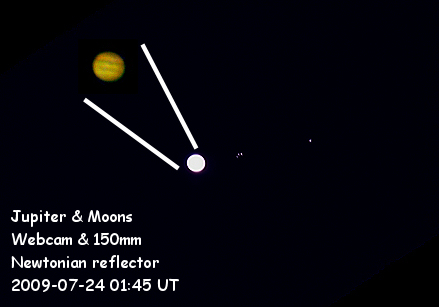
Jupiter & 3 moons
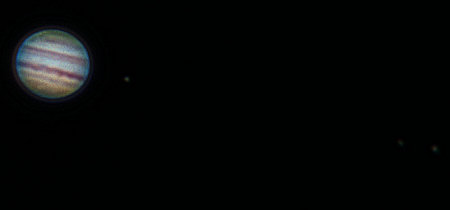
Posted in Astrophotography with tags 150/750, afocal, Canon EOS 450D, Jupiter, Newtonian, no tracking, Registax, shift-and-add, Telescope on 2009/08/12 by computerphysicslabJust some minutes ago.
Hommel crater
Posted in Astrophotography with tags 150/750, afocal, Asclepi, Casio Exilim EX-FS10, crater, digicam, Hommel, Moon, Nearch, Newtonian, no tracking, Paint Shop Pro, Photoshop, Pitiscus, point-and-shoot, shift-and-add, Telescope on 2009/08/10 by computerphysicslabHommel is a big crater with nice craterlets inside, a Clavius-style set, but smaller, measuring 76 miles (129 Km). It is located in the South-East area of the visible Moon face. This area is pledge of small craters. It is similar in appearance to the sand of a beach. Pitiscus, Nearch and Asclepi are some of its neighbors.
The picture was taken at 19 days of lunation, that is 4 days after full Moon. This is the best timing to get sharp images of the crater’s walls’ shadows. The image is an integration of 27 subframes, each one taken at 9 Megapixels single shots with point-and-shoot digicam Casio Exilim EX-FS10.

Mare Crisium & Tranquillitatis
Posted in Astrophotography with tags 150/750, afocal, Astronomy, Canon EOS 450D, Lu, Mare Crisium, Mare Tranquillitatis, Moon, Newtonian, no tracking, Paint Shop Pro, Proclus, Rebel XTi, Reflex, Registax, shift-and-add, Telescope on 2009/08/08 by computerphysicslabTwo days after full moon Mare Crisium shows a nice landscape of mountains and shadows. Some of its inner crates are visible in this picture. The small crater Swift is on the limit of visibility. The big impact called Proclus and its rays are remarkable.
To take this image I used the Canon EOS 450d, Rebel XTI DSLR camera recording video subframes and later I stacked them up with Registax 5. Some small tweaks on Paint Shop Pro 9 and ready.
Full Moon
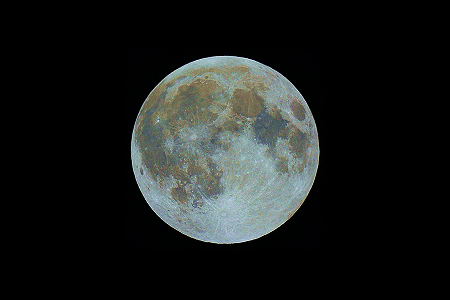
Posted in Astrophotography with tags 150/750, Astronomy, Canon EOS 450D, Canon EOS Rebel XTi, Full Moon, Newtonian, no tracking, Reflex, Registax, saturation, shift-and-add, Telescope on 2009/08/06 by computerphysicslabIn order to catch the Moon, I took 4 single shots at prime focus through my 150/600 telescope. As I lack of a T-mount adapter I had to take them in handheld mode. After de-rotating them accordingly, I stacked them up with Registax 5 and removed the noise a little bit. I used the body camera Canon EOS 450d (Rebel XTi) at high resolution, low sensitivity (ISO 100) and high shutter speed 1/2000. This is the result after a blow up in saturation:
Io’s shadow over Jupiter
Posted in Astrophotography with tags 150/750, afocal, Astronomy, Canon EOS 450D, Io, Jupiter, no tracking, Paint Shop Pro, Registax, shift-and-add, Telescope on 2009/08/05 by computerphysicslabAs Io passes in front of Jupiter, a big shadow is cast over the planet. In this picture I took tonight, it is clearly visible the dark point of shadow in the dead center of Jupiter. At its right a small spot that you may barely watch is Io.

In order to get a sharp image I used a Van Citter deconvolution process.
Jupiter occultation of 45 Cap
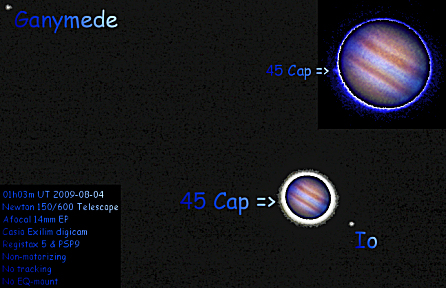
Posted in Astrophotography with tags 150/750, 45 Cap, afocal, Astronomy, Bright star, Casio Exilim EX-FS10, Jupiter, Newtonian, no tracking, occultation, Registax, shift-and-add, Telescope on 2009/08/04 by computerphysicslabJupiter occultation of 45 Cap tonight:
Jupiter with Exilim, 450d & Webcam
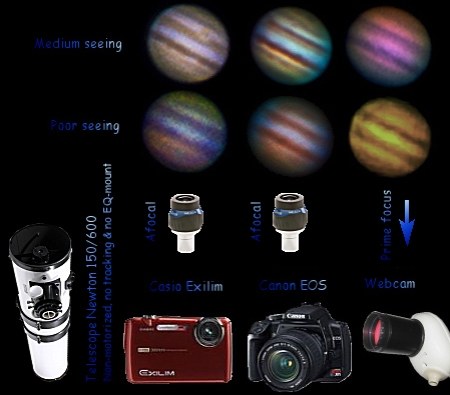
Posted in Astrophotography with tags 14mm, 150/750, afocal, Astronomy, Canon EOS 450D, Casio Exilim EX-FS10, Eyepiece, GRS, Jupiter, Newtonian, no tracking, Philips, Rebel XTi, Registax, shift-and-add, Telescope, ToUcam Pro, webcam on 2009/08/03 by computerphysicslabHere I have integrated my best images of Jupiter taken with 3 different cameras:
* Casio Exilim EX-FS10
* Canon EOS 450D (Rebel XTi)
* Webcam Philips ToUcam Pro
Voyager I vs. Newton 150/600
Posted in Astrophotography with tags 150/750, Astronomy, Jupiter, Newtonian, Telescope, Voyager I on 2009/07/30 by computerphysicslabTrying to find out which are the best colors and contrast to apply to a Jupiter I have come out with this comparative picture, between what Voyager I spacecraft could see and what I could spot last night with my humble newtonian telescope.

Jupiter post-processing
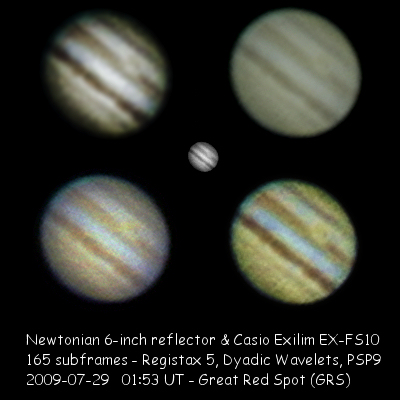
Posted in Astrophotography with tags afocal, Astronomy, Casio Exilim EX-FS10, good seeing, Great Red Spot, GRS, Jupiter, Newtonian, no tracking, Paint Shop Pro, Registax, shift-and-add, Telescope on 2009/07/29 by computerphysicslabI have been lucky tonight. Good seeing to see Jupiter. Using a small binoculars between the eyepiece and my eye I could spot visually Jupiter in high definition at an effective 450x magnification. That’s pretty good for a 150/600 reflector, isn’t it?
As you may appreciate in the following picture, the GRS (Great Red Spot) is clearly visible near the center of the planet. Several details are visible in the Jupiter’s bands. The image was obtained with a non-tracking Newtonian 6-inch telescope, a 14mm eyepiece, a Casio Exilim EX-FS10 digital camera that recorded 165 subframes. Registax 5 dealt with the alignment and stacking process. Dyadic Wavelets were applied to get contrast and details. PSP9 did the post-processing. The footage was taken exactly at 2009-07-28 03:33 UT.
Here several post-processing results are shown. The first one is that I like more.
Jupiter, Europa & Ganymede
Posted in Astrophotography with tags afocal, Astronomy, Casio Exilim EX-FS10, Europa, Ganymede, Jupiter, no tracking, shift-and-add, Telescope on 2009/07/28 by computerphysicslabHere it is, Jupiter, Europa & Ganymede.

My best Jupiter so far
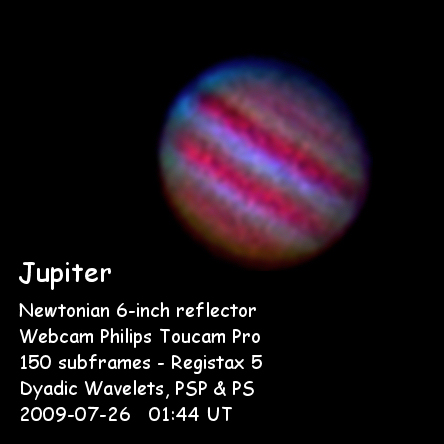
Posted in Astrophotography with tags 6 inches, Astronomy, Jupiter, Newtonian, no tracking, Philips Toucam Pro, Reflector, shift-and-add, Telescope, wavelets, webcam on 2009/07/26 by computerphysicslabMy 6-inch reflector working over a photographic tripod, and a webcam recording the focal plane. This is the resulting image, once overprocessed, yes, I give you that.
With Registax 5 I stacked 150 subframes and then applied dyadic wavelets. Some retouching with Paint Shop Pro 9 and fractal zooming under Photoshop.
The footage corresponds to 2009-07-26 at 01:44 UT.
DSLR to a LightBridge
Posted in Astrophotography with tags Canon EOS 450D, Canon EOS Rebel XTi, Meade Lightbridge 16", prime focus, Reflex, Telescope on 2009/05/18 by computerphysicslabSomeone asked: “Has anyone had difficulty focusing a DSLR to a LightBridge? I bought the appropriate adapters but cannot focus on any subject. It would seem that the LightBridge focuser extends too far away from the secondary. It seems the obvious answer is to install a focuser with less length. ”
Yesterday I was also trying to focus my DSLR Canon EOS Rebel XTi (EOS 450d) through my Meade Lightbridge 16″, but it was not possible. I haven’t still bought any T-adapter, because I was not sure it could reach the focus. Indeed it doesn’t reach it even without any adapter.
Maybe changing the focuser to a zero profile one could work. Or maybe not.
There is a trick to find out where the focal plane is exactly. When seeing the Moon, remove any eyepiece from the focuser and project the light into a cardboard perpendicular to the focuser axis. When the Moon gets clear and focused, there it is exactly located the focal plane at prime focus.
Knowing the distance from the CCD camera to the T-adapter it is possible to find out if a low profile focuser could reach the focus for prime focus astrophotography.
A bit better Saturn
Posted in Astrophotography with tags afocal, Casio Exilim EX-FS10, Dione, Meade Lightbridge 16", no tracking, Registax, Rhea, satellite, Saturn, Telescope, Titan on 2009/05/16 by computerphysicslabFortunately, yesterday was not cloudy and I could do further experiments with Saturn. Using a Barlow 2x and Casio Exilim EX-FS10 camera I filmed some videos at highest resolution through the big dobsonian telescope Meade Lightbridge 16-inch. Weather conditions were good. I did a better collimation than previous days, getting sharp focus from time to time. Stacking the frames with Registax 5 I got this resulting image:
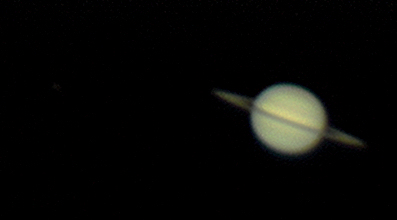
In the left side of the image, it is visible a satellite of Saturn. It is Titan, with 9 magnitude. Over it, a bit at right there is almost visible another one, Rhea of magnitude 10. Visually it was observable another one aligned to Titan and Rhea, but it is not visible in the image. It was Dione with 11 magnitude.
Luckily this image shows the gap between foreside ring and its rear part. The image effective resolution according to my calculations is 1 arcsecond. Two cloud bands are visible one in the north hemisphere and the other in the south.
I would like to break the 1 arcsecond resolution barrier, but I don’t know if it is possible with this telescope. Theoretically it delivers a 0.3 arcsecond resolution because it has 400mm of mirror diameter.
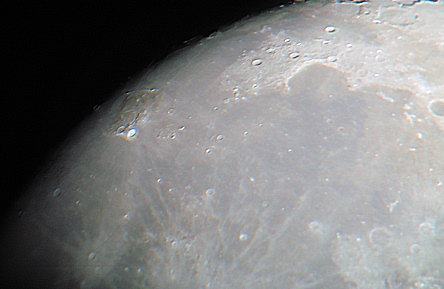
Aristarchus crater
Posted in Astrophotography with tags afocal, Aristarchus, Casio Exilim EX-FS10, crater, Full Moon, Telescope on 2009/05/06 by computerphysicslabAristarchus is a rather peculiar crater. It is for me the most exciting pattern in the Moon. It is located over a weird squared area and there is an important valley near it, to its north-west. It is visible since now, 2 days before Full Moon.
The picture was shot tonight through a non-motorized 150mm (6 inches) reflector using high definition video capture with Casio Exilim EX-FS10.
Meade Lightbridge smoothness
Posted in Astrophotography with tags Dobsonian, Meade Lightbridge 16", Newtonian, no tracking, Reflector, Telescope on 2009/05/05 by computerphysicslabHi CPL,
Thanks for posting that cool vid of the 16″ Lightbridge. I just spoke with someone at a telescope store who said they were looking to get rid of their 12″ Lightbridge because they said it is very shaky when viewing, and gives an unstable image.
I just was in a shop which had an 8″ Lightbridge and I would describe it as very smooth and rock solid.
Can I ask you if you’ve had any shaky or bouncing issues with your 16″?
I’m thinking of the 12″ for myself!
Thanks, PK
—————————————————————————————-
Meade Lighbridge does not come with slow motions for altazimuth movements. If you compare the movement of the Lightbridge with that of a tripod mounted refractor, for example, probably the tripod mounted is going to be much precise.
Nevertheless, it depends too much on what kind of observation are you planning. Watching the Moon, Lightbridge may became very smooth and exact in movement, because you always have a bright lunar surface all over the field of view and the movement you apply to the optical tube is constantly compared to the drift as seen through the eyepiece. On extensive deep sky objects, the same happens. The most difficult objects to track are planets, because the surrounding field of view is pitchblack and you lose any references once the planet gets out of the field.
If you try to use high power eyepieces with small apparent field of view with a planet, the lack of equatorial mount and a sideral motor drive may become a nightmare. In this cases, my advice is to always use widefield eyepieces and reduce the magnification if necessary.
To get a smooth movement it is important to balance correctly the optical tube, adding some magnets at the bottom side of the tube, near the mirror. Do not forget to check that the base of the dobsonian mount is not tilted. Following these advices, the telescope will have a very smooth movement in both axis, as shown in my video at http://www.youtube.com/watch?v=WWUGCk0wN24
The tracking becomes more difficult as longer the focal length. So Meade Lightbridge 16″ is the most difficult to track, because a slight movement in your hands transforms in a great movement in the field. Lower aperture telescopes, have less focal distance and apparent movements in the field are smoother.
If you are planning the use of the telescope for observational purposes, you won’t have any problems with the smoothness of the tracking once you get trained in several sessions. If you plan to do astrophotography, dobsonian movement may become a problem. Nevertheless, I do astrophotography of Moon, planets, and stars through my Meade Lightbridge 16″. You may check it out at my webpage: https://computerphysicslab.wordpress.com/
My final advice is: if you have previously be using regularly a smaller scope doing astronomy, you won’t find any problem using any of Meade Lightbridge series. Collimation is an important point to deal with in this scopes, but the quality of its elements is superb, and the price is really good.
Tycho and the South Pole
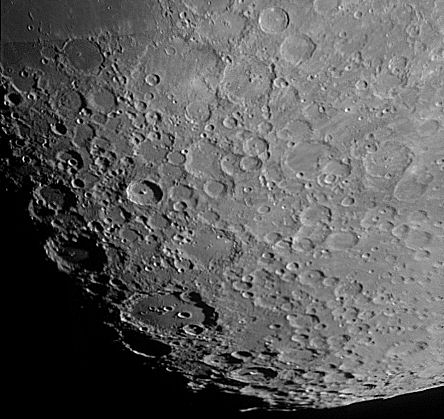
Posted in Astrophotography with tags afocal, Casio Exilim EX-Z80, Clavius, Dob, Meade Lightbridge 16", Moon, non-motorized, Paint Shop Pro, Registax, shift-and-add, South Pole, Telescope, terminator, Tycho on 2009/04/04 by computerphysicslabA sequence of shots to the Moon taken with the Dob Meade Lightbridge 16″ telescope has been integrated into one final image, thanks again to Registax and Paint Shop Pro. This mosaic of Tycho crater and the South Pole region is composed of 30 individual frames. The biggest crater in the terminator is Clavius. Inside it there a lot of small craters.
Where is Sirius B?
Posted in Astrophotography with tags afocal, Canis Major, Casio Exilim EX-Z80, Meade Lightbridge 16", shift-and-add, Sirius, Telescope on 2009/03/23 by computerphysicslabAfter resolving the binary system of Castor I tried unsuccessfully to spot Sirius B. Theoretically it is possible using the Meade Lightbridge 16″, but maybe another luckier night … Integrating 200 half second exposure frames I got this result:

Attaching Exilim to Telescope
Posted in Astrophotography with tags 114/1000, afocal, British Standard Whitworth, BSW, Casio Exilim EX-Z80, screw, Tanzutsu, Telescope, thread on 2008/12/14 by computerphysicslabDigital pocket cameras like Casio Exilim EX-Z80 are not prepared to be attached to the focuser of a telescope. But it is simple to make a hand-crafted device with a piece of wood and a British Standard Whitworth (BSW) screw 1/4″ thread. The attachment is not rock solid, but enough to take photos and videos through the telescope using the afocal technique. Here we see the Casio attached to the Tanzutsu 114/1000 telescope.

The Moon highly saturated
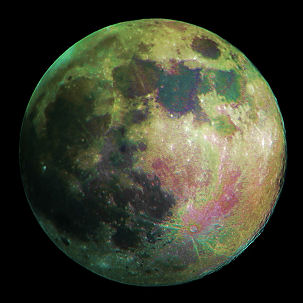
Posted in Astrophotography with tags 114/1000, afocal, Astronomy, Casio Exilim EX-Z80, Catadioptric, color, Full Moon, Mare Tranquillitatis, Moon, Tanzutsu, Telescope, titanium on 2008/12/13 by computerphysicslabUsually we see the Moon as in a gray scale picture, with no color details. Nevertheless the Moon has different hues depending on the chemical composition of the terrain. For example, Mare Tranquillitatis has a blue tone due to its titanium high density. Processing a Moon picture computationally, we may exaggerate its colors, giving high saturation to RGB colors. In the resulting image, Mare Tranquillitatis is the most blueish dark area. Equipment: Telescope Tanzutsu Catadioptric 114/1000.
